The relentless onslaught of spam continues to drive mail administrators up the proverbial wall. DMARC, the unofficial successor to SPF (Sender Policy Framework), holds the promise of more email legitimacy, but can it deliver? Here is how you can put DMARC to the test.
Step 1. Verify your DNS configuration
Make sure you have your A/AAA and MX records set up correctly. For IPv4 traffic, your DNS zone needs at least one record of type A pointing to an IPv4 address; for IPv6 traffic, you need at least one record of the type AAA pointing to a valid IPv6 record (currently, the latter one is optional, but this will change).
Step 2. Set up SPF
DMARC relies on Sender Policy Framework (SPF). You will need a valid SPF record to set up DMARC. Make sure it’s one of the type TXT; the type SPF is deprecated. A valid SPF record could look something like this:
"v=spf1 ip4:12.23.34.567 ip4:34.43.24.65 a:smtp.yourdomain.tld a mx ?all"
Increment your SOA serial number, save your changes and wait for your NS servers to catch up. (Your configuration changes may not reflect in testing tools immediately.)
To validate or pre-validate your SPF syntax, head over to of these services:
https://www.dmarcanalyzer.com/spf/checker/
https://vamsoft.com/support/tools/spf-syntax-validator
Step 3. Generate and test your DMARC record
We recommend the DMARC RECORD GENERATOR by MX TOOLBOX available at:
https://mxtoolbox.com/DMARCRecordGenerator.aspx
Make sure you check out all options available in the wizard. Copy the generated record into a text editor and adjust the mailto: options to reflect your desired setup.
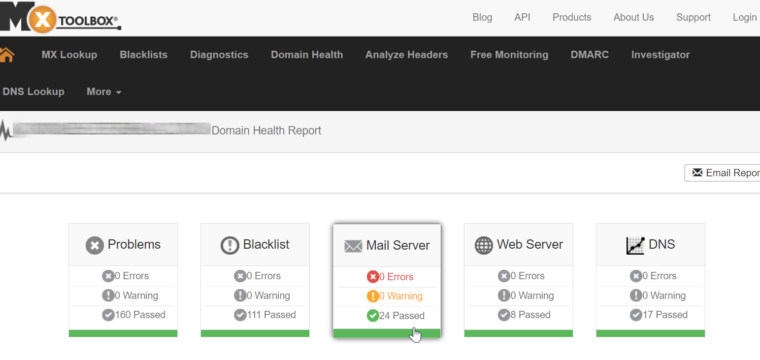
Next, test your DMARC record thoroughly. We recommend the DMARC Inspector by DMARcian:
This utility lists all DMARC tags it discovers as well as implicit tags (those that take effect even though you have not declared them) and explains each one in plain English. Another service worth trying is Fraudmarc.
Step 4. Complete your DNS configuration
You can send DMARC reports either to an email address on the same domain (Option A) or on another domain (Option B).
Option A. Send DMARC reports to an email address on the same domain
If you intend to send DMARC reports to an email address on the same domain they are generated for, use the following settings:
label: _dmarc.yourdomain.tld.
type: TXT
alias: no
TTL (in seconds, example value): 300
Value (example value, enter without quotes): "v=DMARC1; p=none; rua=mailto:dmarc@yourdomain.tld; ruf=mailto:dmarc@yourdomain.tld; fo=1; adkim=r; aspf=r"
With this setup, emails will be delivered even if they fail DMARC validation.
Select the routing policy and save the record set. Be sure to increment your SOA serial.
You are now ready to validate your DMARC record (see step 5 below).
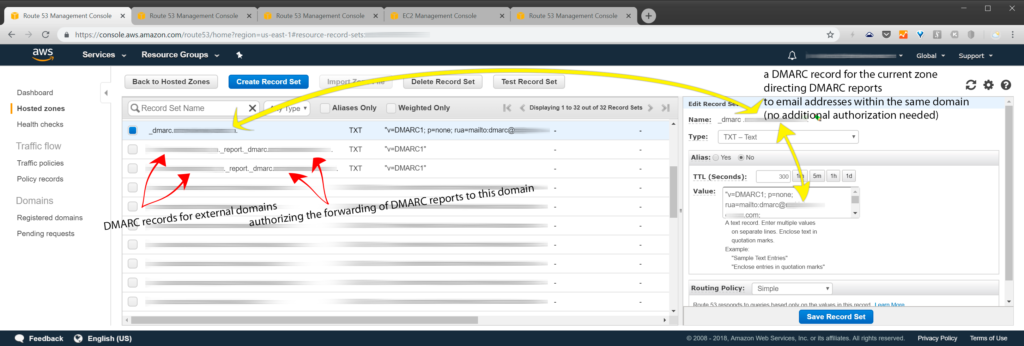
Option B. Send DMARC reports to an email address on another domain
To send your DMARC reports outside of the domain that generates them, you need to authorize the other domain to receive them. Here is how to do that.
[Option B, step 1.] Create a new record set in the zone that will send DMARC reports
label: _dmarc.domain-that-sends-DMARC-reports.tld.
type: TXT
alias: no
TTL (in seconds, example value): 300
Value (example value, enter without quotes): "v=DMARC1; p=none; rua=mailto:dmarc@domain-that-receives-reports.tld; ruf=mailto:dmarc@yourdomain-that-receives-reports.tld; fo=1; adkim=r; aspf=r"
[Option B, step 2.] Create a new record set in the zone that will receive DMARC reports
Open the DNS configuration of the zone that will receive your DMARC reports for yourdomain.tld. Create a new record set using these settings:
label (omit the angle brackets): <domain-that-sends-DMARC-reports.tld>._report._dmarc.<domain-that-receives-reports.tld>.
type: TXT
alias: no
TTL (in seconds, example value): 300
Value (example value, enter without quotes): "v=DMARC1"
Select the routing policy and save. Be sure to increment your SOA serial.
You are now ready to validate your DMARC record (see step 5 below).
Step 5. Keep a watchful eye on your DMARC reports
Verify changes to your DNS configuration using one of the services listed in Step 3 above.
Going forward, you will need to keep an eye on your DMARC reports, particularly if you intend to use a restrictive configuration. It almost goes without saying that if you encounter any undesirable activity, you should take action on the reports immediately.
Leave a Reply