Your users want to access a web server instance as a staging or production environment for DevOps… They want access to the web server document root of the sites they manage. Your job is to maintain the integrity of the whole system in terms of cyber security.
If you happen to be running a web server on Linux—for example in EC2 on Amazon AWS—and need to provide site owners remote access in a secure and responsible manner, here is how to do it.
Rule No. 1: Do NOT enable FTP. Unsecured FTP is a can of worms. Use SFTP (Secure FTP over an SSH tunnel).
What you will need: a Linux instance (preferably with SELinux enabled). In this tutorial, NGINX is the web server, php-fpm is the PHP interpreter.
Step 1. Set proper privileges for your website administrators
Each website (or a set of related websites) should be owned by its own Linux user (for information on creating Unix/Linux users, see this post).
The user needs shell access and a home directory somewhere outside of the web server’s document root (one good place is /home/username).
The website owner also needs to own the php-fpm pool that corresponds to that website (user = websiteowner1 in the configuration file which creates the pool, see this post for more details).
Once this is done, it’s time to allow access to external software tools which support SFTP (such as Adobe Dreamweaver CC, FileZilla and others).
Step 2. Disallow remote authentication by root and verify the ssh configuration of your Linux server
You need a way of signing in to the remote server using ssh without authenticating as root. You should assume superuser privileges (sudo su) only after successful authentication with lower-tier credentials (for example, identified as “administrator”, “ec2-user”, “centos” or whatever you choose to name your remote user). Do not edit the sudoers file. Instead, add your user to the group wheel:
usermod -aG wheel username
and you will be able to sudo su after successful authentication. (By default, all members of the wheel group on RHEL/CentOS/Fedora can assume sudo privileges). Next, verify the ssh setup of your remote machine.
CentOS/RHEL/Fedora store SSH server settings in /etc/ssh/sshd_config:
nano /etc/ssh/sshd_config
In order to override the default of “no subsystems”, make sure that this line is not commented out:
Subsystem sftp /usr/libexec/openssh/sftp-server
To disable remote logins with the credentials of the root user, make sure you have the following entry:
# Prevent root logins:
PermitRootLogin no
When you complete changes to /etc/ssh/sshd_config, restart the sshd service:
systemctl restart sshd.service
Now it’s time to set up access for your site owners.
Step 3. Create a key pair for remote access
On the client machine from which you wish a user to connects, create a key pair. This has to be done locally on the computer that is going to initiate a connection; this is the only way to ensure that the private key does not traverse a network.
On a Linux desktop, this simple task is best accomplished by running ssh-keygen, for example:
$ ssh-keygen -t rsa
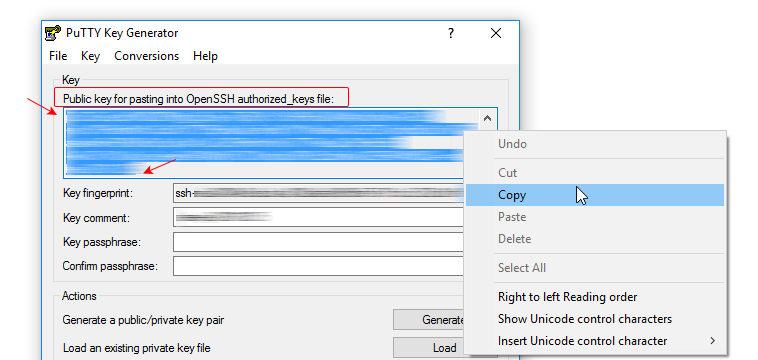
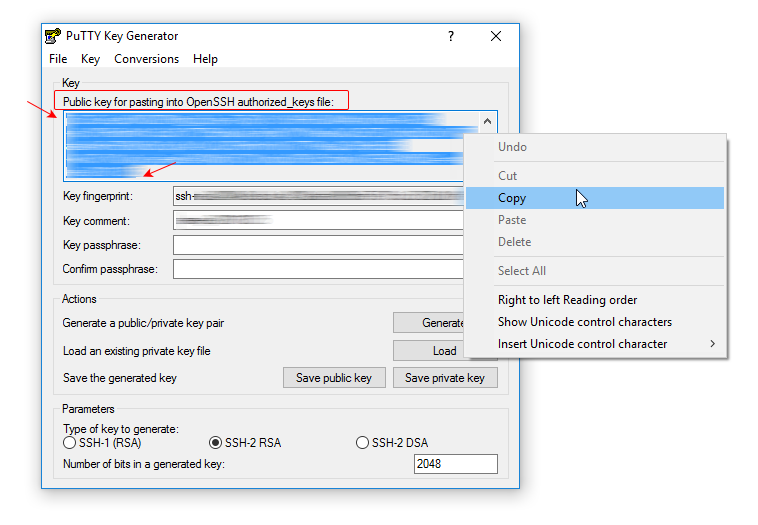
On a Windows desktop, you can create OpenSSH keys using PuTTYgen as described in this post.
A key can be protected by a passphrase. The passphrase, however, is non-recoverable. Should it get lost, your user will need new keys and you will have to repeat the setup. Unless you set a passphrase, however, anyone in the possession of the private key can gain access to the server. The balance between security and usability is a question of your priorities. On systems which represent high-value targets, a passphrase adds tangible value to the setup. This is also the case when the private key resides on a mobile device which can easily be lost or stolen.
IMPORTANT: Each public key must be provided as a one-liner on a separate line. This is the format PuTTy ‘s Key Generator will display right in its application window (it’s not the same public key you obtain when you click on “Save public key”! It is important to be aware of this not-so-subtle distinction.)
Step 4. Set permissions on the private key on your local computer
Set permissions on your private key (the one which remains stored on your local computer):
$ chmod 700 ~/.ssh
$ chmod 600 ~/.ssh/id_rsa
(In the above example, id_rsa is the name of your private key and ~/.ssh is the containing directory).
On SELinux-enabled systems you also need to make sure that the .ssh directory has the correct SELinux contexts:
[root@ip-1-2-3-4 .ssh]# ls -laZ
drwx------. user1 user1 unconfined_u:object_r:ssh_home_t:s0 .ssh
The same goes for its contents:
[root@ip-1-2-3-4 .ssh]# ls -laZ
drwx------. user1 user1 unconfined_u:object_r:ssh_home_t:s0 .
drwx------. user1 user1 unconfined_u:object_r:user_home_dir_t:s0 ..
-rw-------. user1 user1 unconfined_u:object_r:ssh_home_t:s0 authorized_keys
In order to apply any corrections based on the system defaults, run restorecon:
restorecon -R -v /home/kreativj/.ssh
Step 5. Install your public key on the server
Only the public key is transferred to the server; the private key remains on the machine where it was generated.
Install the public key on the remote server by appending it to the ~/.ssh/authorized_keys file, which is located in the home directory of the user the key is intended for:
$ cat id_rsa.pub >> ~/.ssh/authorized_keys
A newly created user may have no .ssh directory. If this is the case, create it and set permissions on it as follows:
chown -Rf user1:user1 /home/user1home
chcon -R unconfined_u:object_r:ssh_home_t:s0  /home/user/.ssh/
or permanently:
semanage fcontext -a unconfined_u:object_r:ssh_home_t:s0 /home/user1home/.ssh/
semanage fcontext -a unconfined_u:object_r:user_home_t:s0 /home/user1home/
Create the key file:
touch .ssh/authorized_keys file
Here is how to set up Dreamweaver for access to the Linux server with the keys just created.
Leave a Reply