CloudInsidr

Cyber security, infotech

  • Subscribe!
  • Privacy Policy
  • Legal
  • Contact Us

Join us on Twitter: @CloudInsidr

Follow us on Twitter: @cloudinsidr
  • news & alerts
    • events
    • industry analysis
    • industry gossip
    • people
  • cloud, edge & co.
    • AWS
    • administration & orchestration
      • web servers in the cloud
      • mail servers
      • databases
  • cybersec & warfare
    • encryption
  • blockchain
Home cloud, edge and everything in between administration and orchestration How to Use Letsencrypt across Servers in the Manual Configuration Mode with a CSR
How to Use Letsencrypt across Servers in the Manual Configuration Mode with a CSR

Anna E Kobylinska 2016-02-10 Leave a Comment

How to Use Letsencrypt across Servers in the Manual Configuration Mode with a CSR

Generating SSL certificates when Letsencrypt (what is Letsencrypt, who is behind it, and how the heck can you get started) is available for your system works in a breeze, but what if you need your certificates for a machine that won’t take Letsencrypt (for whatever reason)? It is still possible: you can either grab Letsencrypt from Git, or, for reasons of practicality… create a certificate signing request (CSR) on your target server, transfer it to your letsencrypt instance, generate the certificates you need, then transfer the generated files back to your target instance and install the certificates in your software.

Step 1. Adjust the DNS configuration for your target server (the one that needs the certificates)

Make sure that requests to the host names that need the certificates are being routed to the IP address of your target server via an A entry. Unless an A entry is in place, letsencrypt (on your other instance) will flat-out refuse to cooperate.

Step 2. Adjust openssl configuration on your target server (the one that needs the certificates)

On the target machine (that is, on the server that will be using the certificates), navigate to the openssl configuration file openssl.cnf located in:

cd /etc/pki/tls

Make a copy of it.

cp openssl.cnf openssl.cnf-original

Now open the original in a text editor of your choice. Enter these two lines:

[SAN]
subjectAltName=DNS:domainname1.tld,DNS:host.domainname1.tld,DNS:host2.domainname2.tld

Make sure you replace the host names (domainname1.tld, etc.) with the host names that you want to generate your certificates for.

Step 3. Generate the certificate signing request on the server that will be using the certificates

On the target server (that’s the one that needs the certificates but can’t run letsencypt), generate the certificate signing request using the config file that you modified in Step 2 above:

openssl req -new -newkey rsa:2048 -sha256 -nodes -keyout filename.privkey1.pem -out filename.der -outform der -subj "/C=US/ST=Nevada/L=Las Vegas/O=domainname1.tld" -reqexts SAN

Adjust the parameters as needed, especially the country, state, city, and your domain name (entering incorrect information constitutes a breach of the Terms of Service of Letsencrypt, so no “test city” here!).

You should see a confirmation. Verify that openssl has generated two files:
a .pem private key and a .der encoded certificate signing request (CSR). Don’t bother converting them, letsencrypt will do just fine.

Creating a CSR in openssl
Creating a CSR in openssl on the target server
Step 4. Transfer the CSR .der file to your letsencrypt machine

Transfer the .der file to your letsencrypt machine. One way to do this is using rsync, another good option is FileZilla.

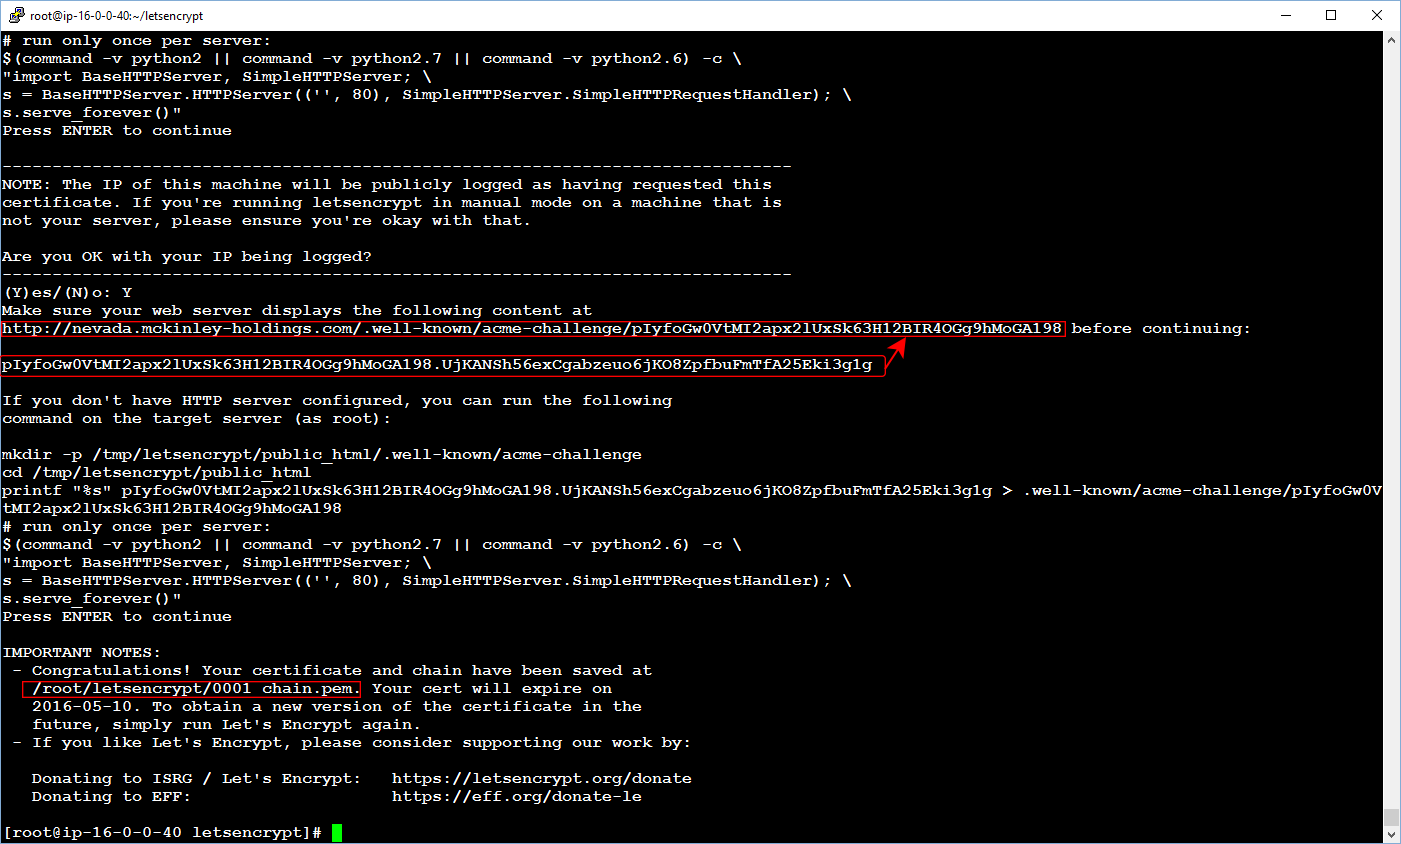
Step 5. Request your certificate files

On the letsencrypt machine, request your certificate files:

letsencrypt certonly --authenticator manual --server https://acme-v01.api.letsencrypt.org/directory --text --email your@emailaddress.com --csr host.domain.com.der

Your IP will be publicly logged as having requested the certificate.

In order to authenticate your server, follow the onscreen instructions. You can either save an authentication file to a web server directory and serve it via http, or run a Python script that the assistant provides, whichever seems more convenient. You should see a confirmation message announcing the path to your certificate chain.

Letsencrypt: server authentication methods and a success message
Letsencrypt (on your letsencrypt machine): server authentication methods and a success message
Step 6. Transfer generated files back to the target server

Transfer generated files back to the target server and save them with 640 permissions. Configure your software (such as your mail server and your web server) to use the certificates, and don’t forget to renew them within 90 days!

Filed Under: administration and orchestration, cybersecurity and cyber warfare, encryption, mail servers, web servers in the cloud Tagged With: CSR, encryption, SSL

Leave a Reply Cancel reply

Your email address will not be published. Required fields are marked *

Subscribe

SSL/TLS Certificate Square (250 x 250)

Pearson Education (InformIT)

SSL/TLS Certificate Medium Rectangle (300 x 250)

Recent Posts

  • Upgrading from CentOS 6 to CentOS 7 and Beyond?
  • How To Figure Out Who is Signing In To Dovecot to Send or Retrieve Email
  • OpenSSH 9.9 Introduces Enhanced Quantum-Resistant Algorithms
  • OpenSSL 3.3 Final Release is now live!
  • How to Activate HTTP/2 with TLS 1.3 Encryption in NGINX for Secure Connections without a Performance Penalty
  • Is AWS sucking your budget dry? Strip it down to the nitty-gritty (without breaking stuff)
  • How to attach and mount an NVMe EBS volume on EC2
  • SELinux security contexts: correcting SELinux labels on a file system
  • Intel gobbling up Israeli Tower Semiconductor, Stock Goes Through The Roof
  • NGINX on AWS EC2: setting up a web server from scratch on a domain of your choice
  • Log4j RCE and mitigation techniques
  • Set up logrotate for Postfix

Symantec

Categories

  • administration and orchestration
  • alerts
  • AWS
  • Bitcoin
  • cloud, edge and everything in between
  • cryptocurrencies
  • cybersecurity and cyber warfare
  • databases
  • DNS
  • encryption
  • events
  • FinTech and InsurTech
  • homeland security
  • HTTP Security Headers
  • industries
  • industry analysis
  • industry gossip
  • Java
  • Linux
  • mail servers
  • networking
  • news
  • NGINX
  • people
  • php-fpm
  • reviews
  • SELinux
  • tips and tricks
  • Uncategorized
  • web servers in the cloud

Tags

AMI AWS AWS EBS Azure certificate cipher suites cryptography cyber defense cybersecurity cyber security Diffie-Hellman DNS DNS over HTTPS Dovecot EBS EC2 email encryption Fedora HTTP/2 HTTPS IBM letsencrypt Linux logs MariaDB MFA MySQL NGINX OpenSSL permissions php-fpm PHP 7 postfix RegEx Route 53 RSA SELinux SQL SSH SSL TLS TLS 1.3 TLS vulnerabilities WordPress

Archives

  • January 2025
  • November 2024
  • October 2024
  • May 2024
  • January 2023
  • March 2022
  • February 2022
  • December 2021
  • December 2020
  • November 2020
  • September 2020
  • January 2020
  • November 2019
  • August 2019
  • July 2019
  • April 2019
  • December 2018
  • October 2018
  • September 2018
  • August 2018
  • June 2018
  • May 2018
  • April 2018
  • February 2018
  • December 2017
  • November 2017
  • October 2017
  • August 2017
  • April 2017
  • February 2017
  • January 2017
  • November 2016
  • September 2016
  • August 2016
  • July 2016
  • March 2016
  • February 2016
  • January 2016
  • December 2015
  • November 2015
  • October 2015
  • September 2015
  • July 2015
  • February 2015

Recent Comments

    Wicked fast Networking (With a Government Clearance to Boot)

    ©2022 CybrAnalytiqa OÜ

    • Content purchasing and syndication